
- home
- BAKERECIPES
BakeRecipes
Bringing real baking into your home with deliciously simple recipes.
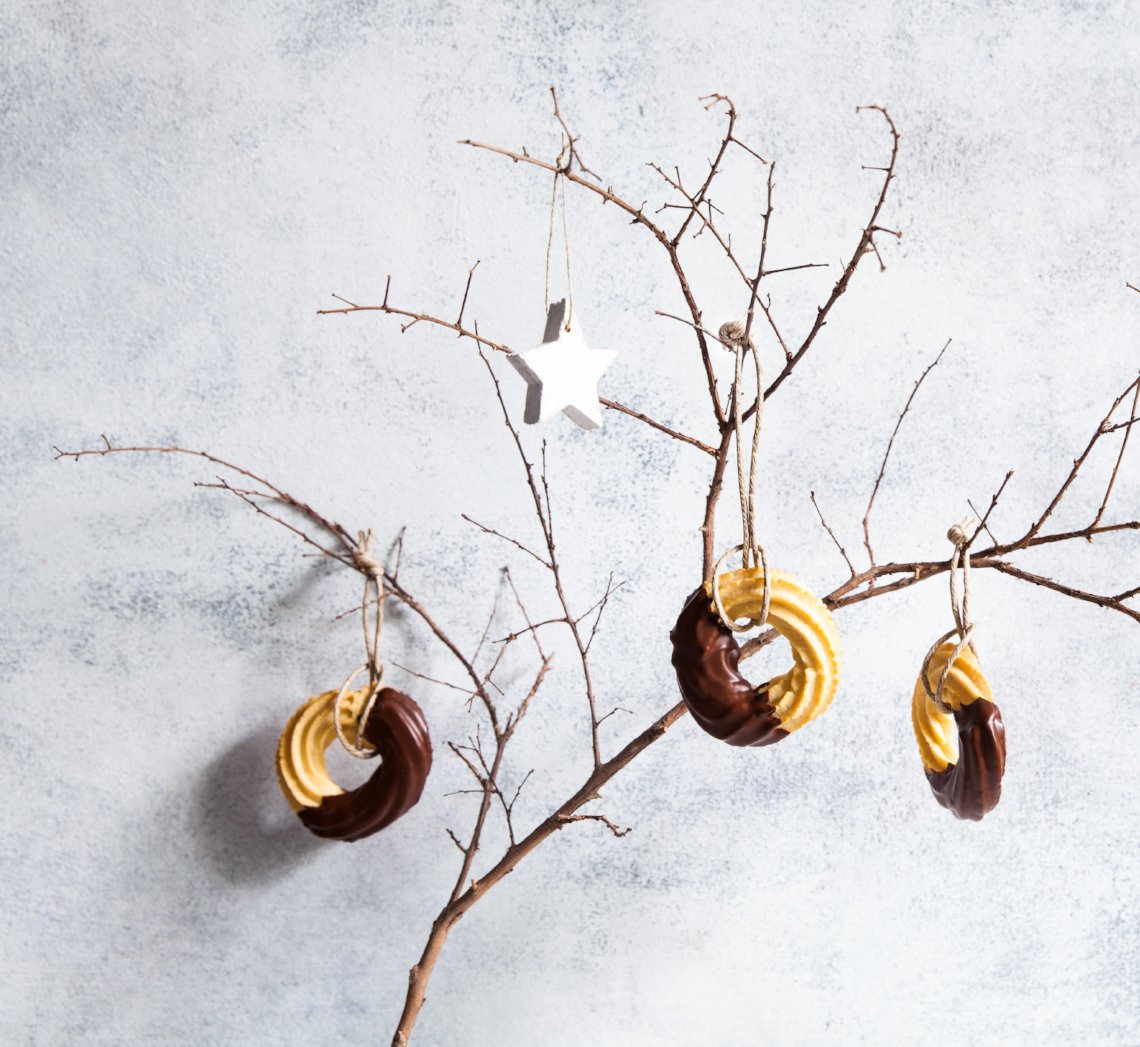
Prep 30min (+15min cooling and 1hr standing time)Bake 15minMakes 20
The German word spritzen means to squirt and reflects the way these cookies are shaped – by pushing them through a piping nozzle. The almond meal in the dough gives a lovely soft, almost cakey, texture to these chocolate-dipped cookies that can be piped in various designs, including mini wreaths.
Ingredients
- 250g butter, softened
- 220g (1 cup) caster sugar
- 1½ teaspoon natural vanilla essence or extract
- 3 eggs
- 450g (3 cups) plain flour
- 60g almond meal
- 300g good-quality dark chocolate (45-54% cocoa), chopped
Method
- Preheat oven to 180°C (160°C fan-forced). Line two large oven trays with non-stick baking paper.
- Use an electric mixer to beat the butter, sugar and vanilla until pale and creamy. Add the eggs, one at a time, beating well between each addition. Combine the flour and almond meal. Add to the butter mixture and beat on the lowest possible speed until just combined.
- Spoon half the mixture into a large piping bag fitted with a 13 mm (#13) star nozzle. Pipe 6–7 cm circles onto the lined trays (see Baker’s tips). Repeat with the remaining mixture.
- Bake for 15-18 minutes, swapping the trays halfway through baking, or until pale golden and cooked through. Cool on the trays.
- Place the chocolate in a heatproof bowl over a saucepan of simmering water and heat, stirring occasionally, until melted. Turn off the heat but leave the bowl sitting on top. Dip a cooled cookie into the chocolate to coat half of the cookie. Place back on the lined tray and repeat with the remaining cookies. Tap the trays on the benchtop lightly to settle the chocolate into the grooves of the cookies, then set aside for about 1 hour or until the chocolate sets.
Baker's tips
- You can use a 6–7 cm round cutter as a guide to draw circles onto the underside of the baking paper to help keep your cookies uniform in size.
- These cookies will keep in an airtight container at room temperature for up to 1 week.
This recipe is from Anneka's SBS Food online column, Bakeproof: Festive Cookies.
CLICK HERE for more Bakeproof columns and recipes.
Photography by China Squirrel.
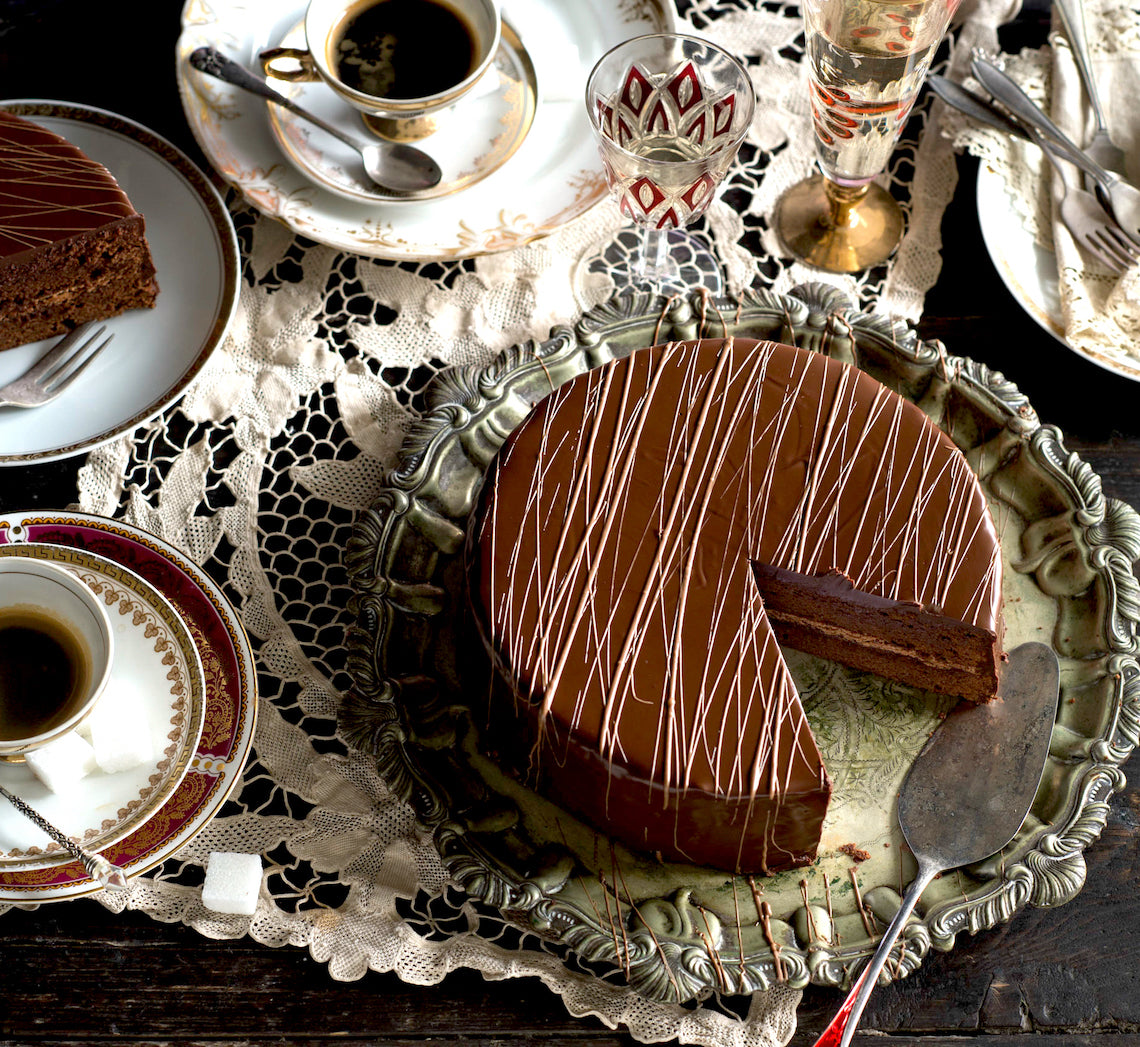
Prep 40min (+1hr cooling and 2hr standing time)Bake 30minMakes 10-12 serves
Possibly the most famous cake in the world, and certainly the pride of Austria, Sacher Torte was created by Franz Sacher, a 16-year-old apprentice stepping in for an ill head chef, to impress the guests of Prince Wenzel von Metternich. And as they say, the rest is now cuisine history. This elegant, rich and enticing cake is now loved the world over.
Ingredients
Melted butter, to grease
125g unsalted butter, softened
125g (1 cup) icing sugar, sifted
1½ teaspoons natural vanilla essence or extract
6 eggs, at room temperature, separated
175g good-quality dark chocolate (54% cocoa), chopped, melted and cooled to room temperature
110g (¾ cup) plain flour
110g (½ cup) caster sugar
85g (¼ cup) apricot jam, warmed and sieved
40g good-quality milk chocolate, melted, to decorate
Thick or whipped cream, to serve
Chocolate Glaze
300g good-quality dark chocolate (54% cocoa)
60g butter, cubed
Method
- Preheat oven to 180°C (160°C fan-forced). Brush 2 x shallow 20cm round cake tins with melted butter to grease and line the bases with rounds of non-stick baking paper.
- Use an electric mixer to beat the butter, icing sugar and vanilla until pale and creamy. Add the egg yolks and beat until well combined and creamy. Beat in the cooled melted chocolate until well combined. Use a large metal spoon or spatula to fold in the flour until just combined.
- Use an electric mixer with a whisk attachment to whisk the egg whites in a large clean, dry bowl until soft peaks form. Add the caster sugar and whisk on medium-high speed until thick and glossy and all the sugar has dissolved (see Baker’s tip). Add half the egg white mixture to the chocolate mixture and use a large metal spoon or spatula to fold in to ‘loosen’ the mixture. Add the remaining egg white mixture and fold until just evenly combined.
- Divide the mixture evenly between the tins and use the back of a spoon to smooth the surface. Bake in preheated oven for 30 minutes or until a skewer inserted into the centre of the cakes comes out clean. Stand in the tins for 10 minutes before turning onto a wire rack to cool (this will take about 1 hour).
- Once cool, spread one cake layer with the warmed sieved jam and then top with the second layer, bottom side up. Place the cake on a wire rack over a tray and set aside while making the chocolate glaze.
- To make the chocolate glaze, combine the chocolate and butter in a heatproof bowl and place over a saucepan of barely simmering water (make sure the base of the bowl doesn’t touch the water). Stir occasionally until just melted and combined. Use a plate knife to spread a little of the glaze over the outside of the cake to form a ‘crumb coat’ and to even the surface. Place in the fridge for 20 minutes or until set. Remove from the fridge and carefully pour over the rest of the glaze, allowing it to run down the sides of the cake to coat evenly. Tap the cake, still on the rack, gently on the tray to remove any air bubbles and to settle the glaze. Use a fork to drizzle the milk chocolate over the top of the cake to decorate. Set aside for 2 hours or until the glaze sets. Serve cut into small wedges with cream.
Baker’s Tips
- To test if all the sugar has dissolved, rub a little of the egg white and sugar between two fingers – you will be able to feel if there is still undissolved sugar. Whisk for another minute if not completely dissolved before testing again.
- This cake will keep in an airtight container at room temperature for up to 4 days.
This recipe is from Anneka's SBS Food online column, Bakeproof: Austrian Baking.
CLICK HERE for more Bakeproof columns and recipes.
Photography by Alan Benson.
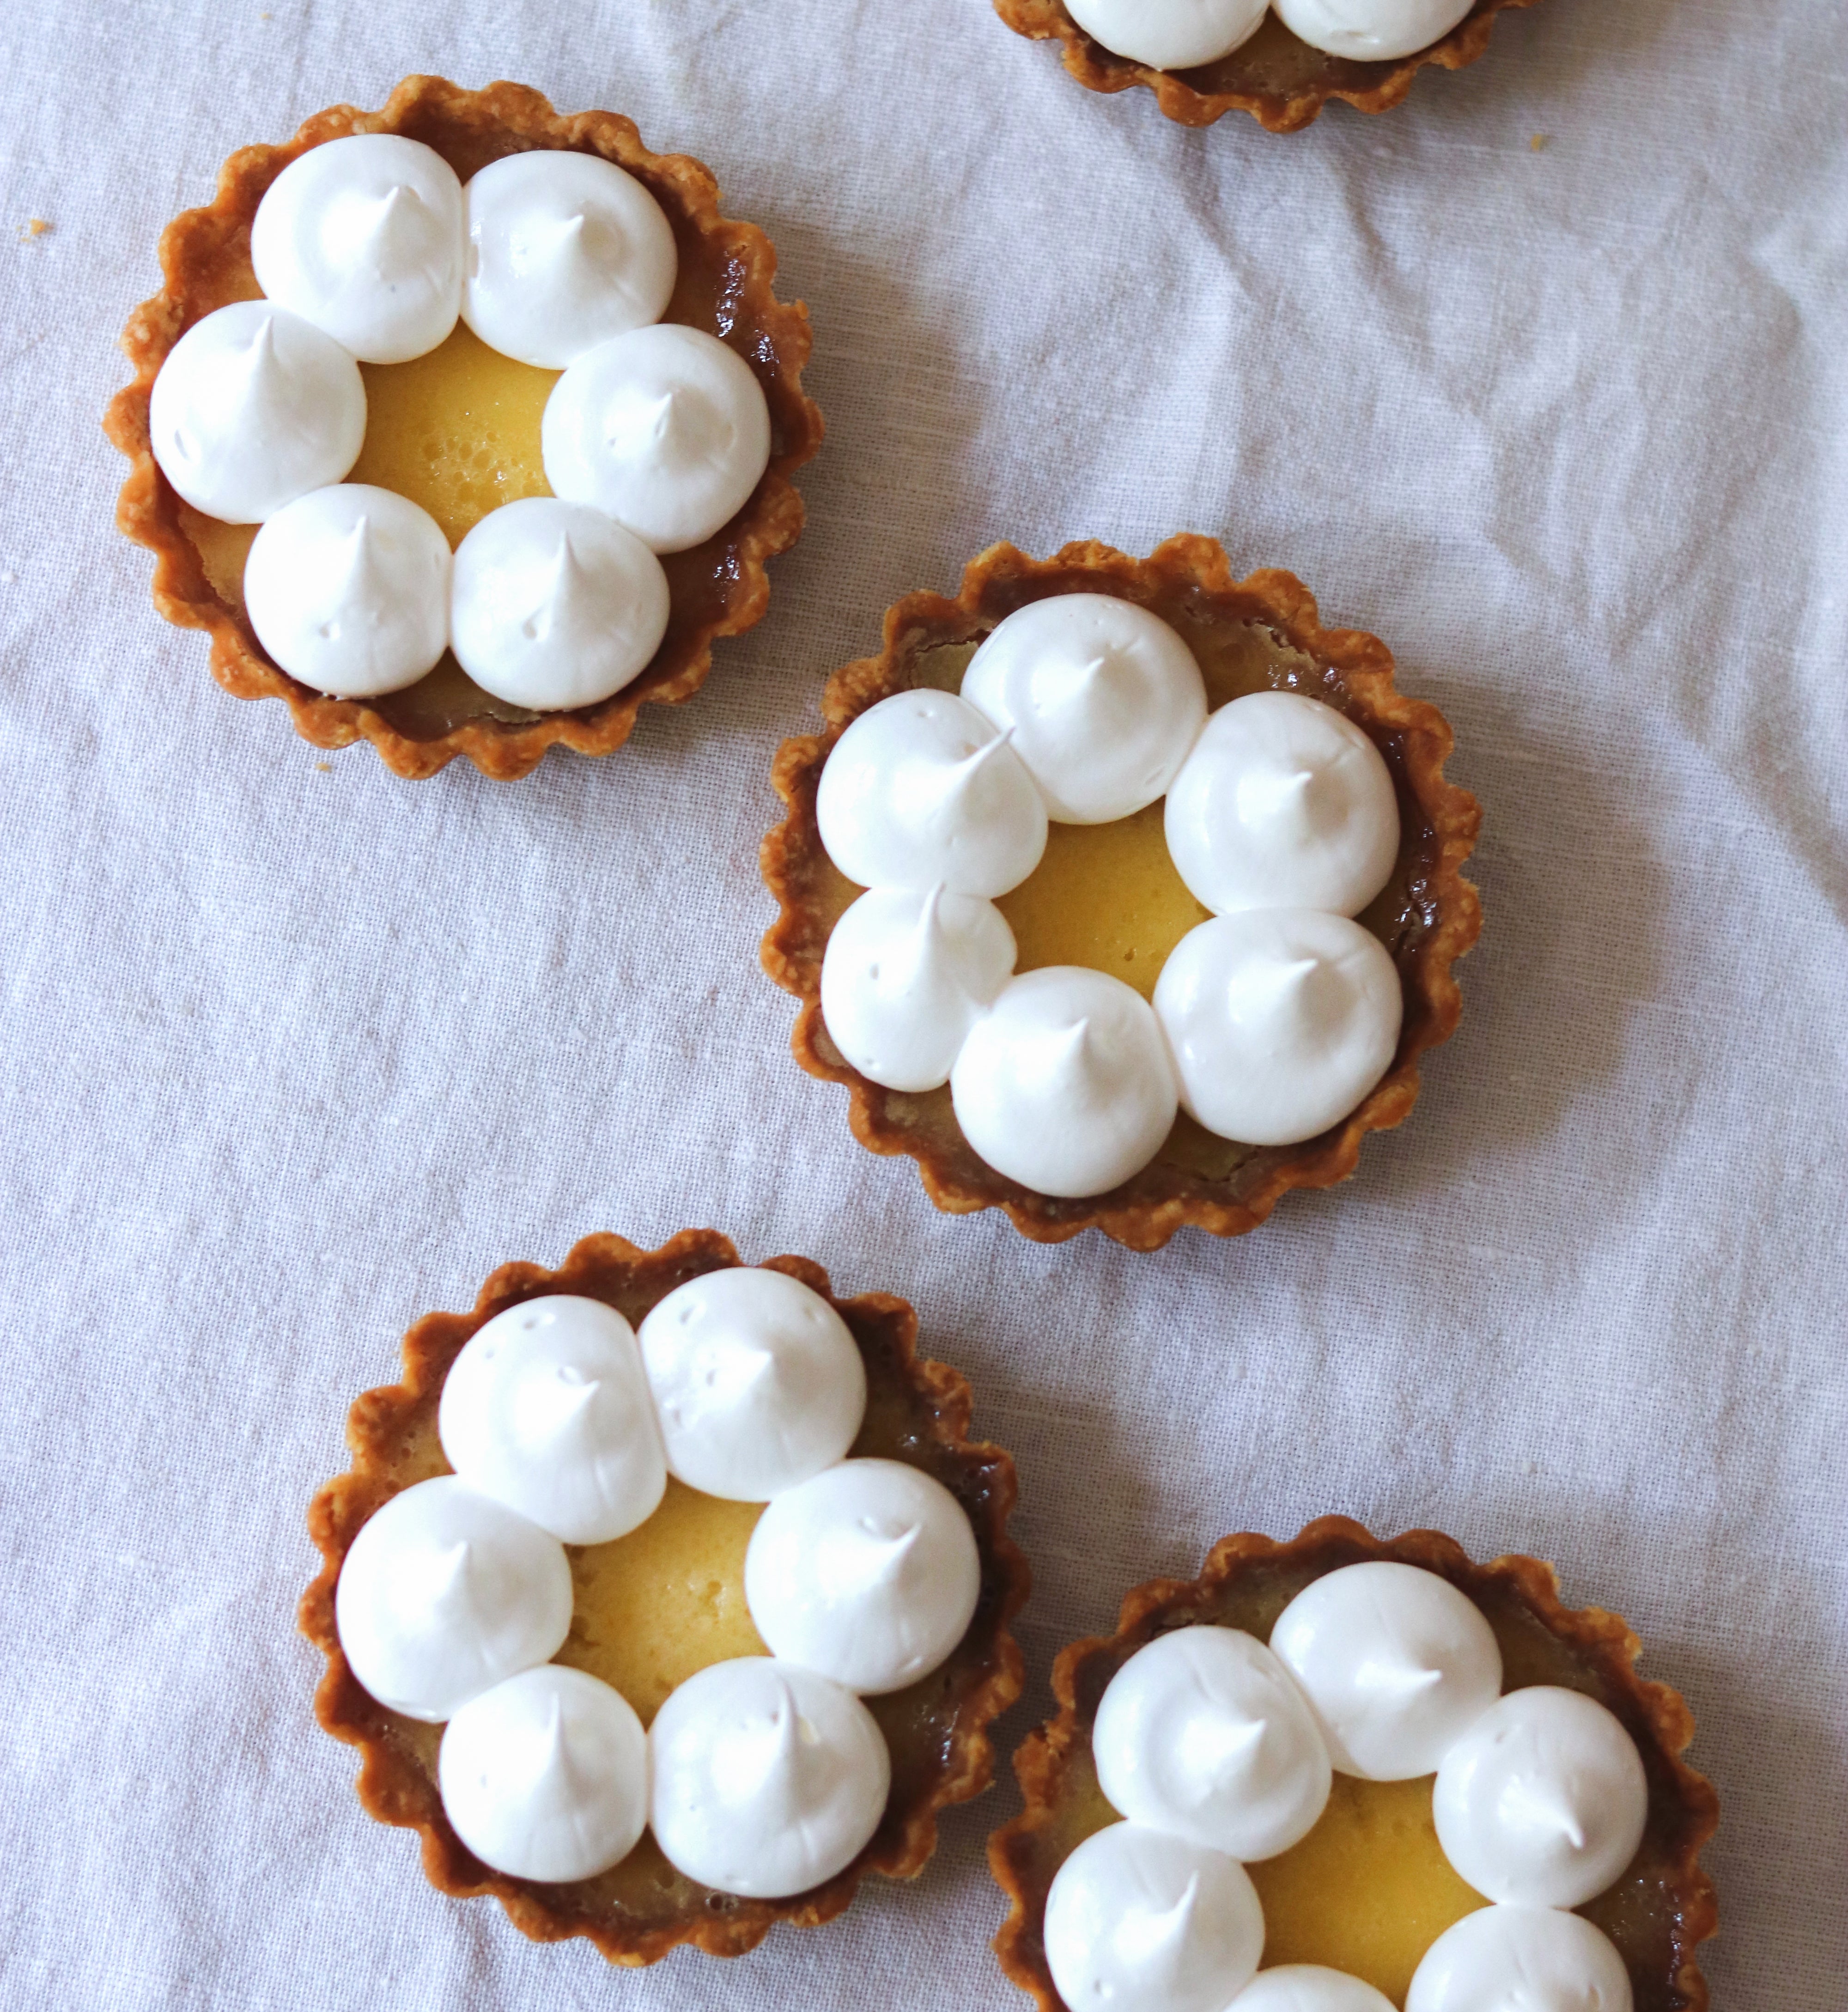
Prep 40min (+ pastry making time)Bake 35minMakes 10
Italian meringue makes an elegant topping for these classic tarts. You can caramelize the meringue lightly with a blow torch to add a delicate, slightly burnt caramel flavour to complement the sweetness of the meringue and sourness of the lemon filling if you wish.
Ingredients
1 quantity Sweet Shortcrust Pastry, rolled into a log about 15cm long before wrapping and chilling as directed
Icing sugar (optional), to sprinkle
Cream or ice cream, to serve
Filling
2 eggs110g (½ cup) caster sugar
125ml (½ cup) pouring (thin) cream
100ml strained fresh lemon juice
Italian Meringue
4 egg whites, at room temperature220g (1 cup) caster sugar
60ml (¼ cup) water
Method
-
Preheat the oven to 200°C (180°C fan-forced).
-
Remove the pastry from the fridge and cut into 10 even slices. Gently pat a pastry portion on a lightly floured benchtop with the palm of your hand to fatten slightly. Use a lightly floured rolling pin to roll out to a disc about 3mm thick. Line a 6.5cm (base measurement), 2cm deep, tart tin with removable base, with the pastry, pressing it into the side and corners with your thumb and/or fingertips. Roll the rolling pin over the top of the tart tin to trim any excess pastry. Repeat with the remaining pastry portions to make 10 tart cases in total.
-
Place the tart cases on an oven tray. Use a fork to prick the pastry base of each about 4 times. Line the pastry cases with squares of greaseproof paper or foil and fill with pastry weights, dried beans or raw rice, making sure they press into the corners and fill the cases. Bake in preheated oven for 10 minutes.
-
Remove the tart cases from the oven and use the paper or the foil to remove the weights from the cases. Return the cases to the oven and bake for a further 5-10 minutes or until the pastry is just cooked through and looks dry.
-
Meanwhile, to make the filling, use a fork to whisk the eggs, sugar, cream and lemon juice together until well combined. Strain the mixture into a jug. Pour the filling into the hot pastry cases while still in the oven (see Baker's Tips), dividing evenly. Reduce the oven temperature to 160°C (140°C fan-forced) and bake for a further 10 minutes or until the filling has just set in the centre but still wobbles slightly when shaken. Cool the tarts in the tins.
-
To make the Italian Meringue, put the egg whites in the bowl of a stand mixer fitted with a whisk attachment. Combine the sugar and water in a small saucepan and stir with a wooden spoon over low heat until the sugar dissolves. Increase the heat to medium and bring to the boil. Boil for about 10 minutes, occasionally brushing down the side of the pan with a pastry brush dipped in water to dissolve any sugar crystals, until the syrup reaches hard ball stage (120°C on a sugar thermometer).
-
Meanwhile, just before the syrup is ready, whisk the egg whites on high speed until firm peaks form. Remove the syrup from the heat and stand for a bout 1 minute or until the bubble subside. With the motor running on high speed, gradually add the sugar syrup in a thin steady stream until all the syrup has been incorporated. Continue to whisk on medium speed for another 10 minutes or until the meringue has cooled to room temperature.
-
Spoon the meringue mixture into a large piping bag fitted with a #13 (1.3cm) plain or #11 (1.1cm) star nozzle. Pipe small rounds of meringue over the surface of the tarts to cover. Use a blow torch to lightly caramelize the meringue if desired.
-
Dust with icing sugar, if desired and serve with cream or ice cream.
Baker's Tips
- Adding the filling to the pastry cases while still sitting in the oven will mean you can fill the tarts completely and minimise the chance of it spilling when transferring it to the oven.
- These tarts will keep in an airtight container in the fridge for up to 2 days (although the pastry will soften slightly on keeping). Bring to room temperature to serve.
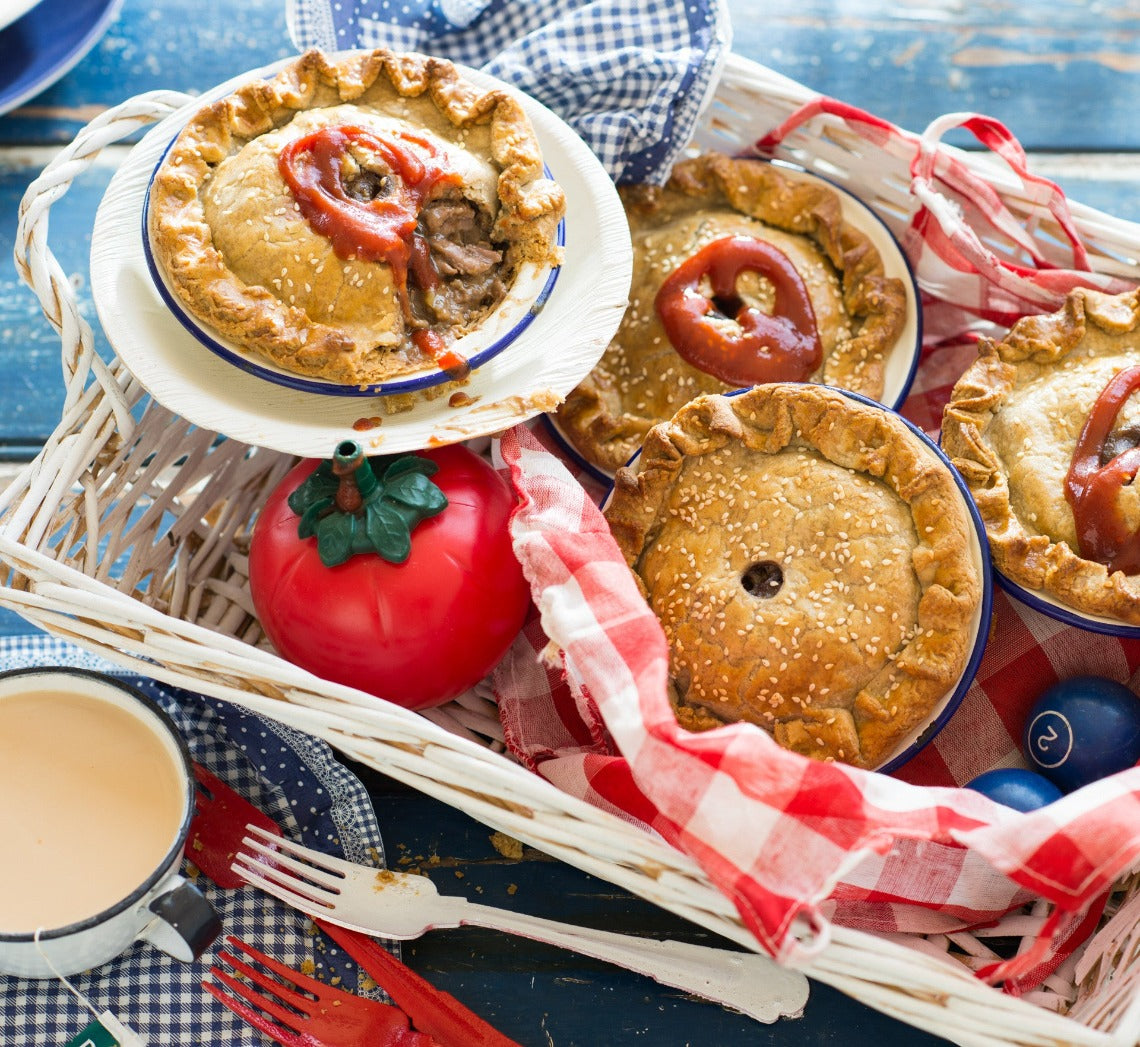
Prep 1hr (+2hr cooling and 5min standing time)Bake 2hr 30minMakes 6 serves
The addition of allspice, shiitake mushrooms, ginger and oyster sauce give these good old Aussie pies a subtle, but truly delicious, Chinese twist.
Ingredients
3 quantities shortcrust pastry (each with the addition of 1 teaspoon ground allspice added with the flour), each made separately and shaped into a disc before wrapping and chilling (see Baker's Tips)
1 egg, lightly whisked
sesame seeds, to sprinkle
Filling
1kg trimmed chuck steak, cut into 2cm chunks
35g (¼ cup) plain flour
60ml (¼ cup) peanut oil
2 small brown onions, chopped
200g shiitake mushrooms, sliced
2 garlic cloves, finely chopped
3 teaspoons finely grated ginger
250ml (1 cup) good-quality beef stock
500ml (2 cups) water
2 tablespoons oyster sauce, or to taste
Method
- Place the chuck steak in a large bowl, sprinkle with the flour and toss to coat.
- Heat 1 tablespoon of the oil in a large heavy-based saucepan over a high heat and cook half the steak chunks, stirring occasionally, for about 5 minutes or until sealed. Remove from the pan, scraping any cooked-on bits from the base, and set aside. Repeat with another tablespoon oil and the remaining steak.
- Clean the pan if necessary. Add the remaining 1 tablespoon oil, onion and shiitake mushrooms and cook over a medium-high heat, stirring occasionally, for 5 minutes or until the onion and mushrooms start to soften. Reduce the heat to medium, add the garlic and ginger and cook for a further 1 minute, stirring occasionally, or until aromatic. Return the steak to the pan with the stock, water and 1 tablespoon of the oyster sauce and bring to a simmer.
- Reduce heat to low and simmer, covered, for 30 minutes, stirring occasionally. Uncover and then simmer for a further 30 minutes to 1 hour, stirring frequently or until the meat is tender and the liquid has reduced and thickened to a thick sauce consistency. Stir in the remaining oyster sauce, taste and adjust seasoning by adding a little more oyster sauce if necessary. Transfer the mixture to a heatproof bowl, cover and place in the fridge, stirring occasionally, until cooled to room temperature (this will take about 2 hours).
- When ready to assemble the pies, preheat oven to 220°C (200°C fan-forced). Brush 6 x 10.5cm (base measurement) x 14cm (top measurement) metal or foil pie dishes. Unwrap the pastry discs and divide each into quarters. Shape a quarter into a disc and use a lightly floured rolling pin to roll the pastry on a lightly floured bench top into a round until about 3mm thick and about 15cm in diameter. Repeat with the remaining discs. Use an upturned pie dish to cut out pie lids from 6 of the rolled pastry rounds. Use the end of a 1cm piping nozzle or a small sharp knife to cut a small steam hole in the centre of each pie lid.
- Gently ease the the uncut pastry discs into the pie dishes and use your fingertips to press the pastry gently into the corners without stretching it — it will overhang the dishes slightly. Divide the steak mixture between the pastry cases to fill. Place a lid over the mixture to cover each pie, brush the edge of each lid with the whisked egg and then fold the excess pastry from the bases over the top of the lids, crimping with your fingertips or pressing with a fork together to seal. Brush the top of each pie lightly with some of the remaining egg wash and sprinkle with sesame seeds.
- Reduce the oven to 200°C (180°C fan-forced) and bake the pies in preheated oven for 45-50 minutes or until the pastry is cooked through and a deep golden. Stand the pies in the dishes for 5 minutes before turning out and serving.
Baker's Tips
- Don't be tempted to make the 3 quantities of pastry all at once. Making them separately makes the pastry easier to handle and will give you a better final result.
Photography by Alan Benson.Save

Prep 1hrBake 55minMakes 6 serves
Fun to make and scrumptious to eat, this homemade baked gnocchi combines pumpkin, tomatoes and spinach for a delicious, nutritious meal, made all the more fun by being served in individual dishes.
Ingredients
75g baby spinach
100g bocconcini, thinly sliced
Pumpkin gnocchi
350g unpeeled butternut pumpkin, deseeded and cut into 6 chunks
650g medium Desiree potatoes, unpeeled
salt and freshly ground black pepper, to taste
110g (½ cup) plain flour, plus extra to dust
Tomato sauce
100g bacon rashers, trimmed and chopped
1 garlic clove, crushed
1 x 400g can chopped tomatoes
1 teaspoon sugar
2 tablespoons pouring cream
salt and freshly ground black pepper, to taste
Method
- Preheat oven to 180°C (160°C fan-forced). Line a tray with a clean tea towel and dust lightly with flour.
- Place the pumpkin in an ovenproof dish, cover with foil and bake in preheated oven for 40 minutes or until tender when tested with a skewer. Set aside to cool slightly. Increase the oven temperature to 200°C (180°C fan-forced).
- Meanwhile, put the whole potatoes in a saucepan of water, cover with a lid and bring to the boil over medium heat. Boil for 30 minutes or until the potatoes are tender with tested with a skewer. Drain and set aside until cool enough to handle.
- Next, peel the warm potatoes, return the flesh to the dry saucepan and mash until smooth. Use a metal spoon to press a third of the potatoes through a coarse sieve or fine colander into a large bowl. Repeat with the remaining mashed potato in 2 more batches.
- Remove the pumpkin skin from the flesh and discard. Add the flesh to the potato and mash together. Season well with salt and pepper. Add the flour and use a wooden spoon and then your hands to mix to a firm but slightly sticky dough (adding a little more flour if necessary). Divide the dough into 4 equal portions and roll each out on a lightly floured bench top into a log about 2cm in diameter. Cut the logs into 2cm lengths and then roll each into a small ball. Gently roll each ball, one at a time, over the back of a lightly floured fork to form the gnocchi, placing on the tea towel-lined tray as they are finished.
- To make the tomato sauce, cook the bacon in a small saucepan over medium-high heat for 5 minutes, stirring occasionally, or until starting to colour. Add the garlic and cook for 1 minute or until aromatic. Add the tomatoes and sugar, bring to a simmer and simmer over medium-low heat for 10 minutes or until thickened slightly. Remove from the heat, stir through the cream and season with salt and pepper.
- Bring a large saucepan of salted water to the boil. Add a quarter of the gnocchi and boil for 2 minutes or until they just rise to the surface. Remove from the water immediately with a slotted spoon and place in a colander to drain well before transferring to a large bowl. Repeat with the remaining gnocchi in 3 more batches.
- Add the tomato sauce to the gnocchi with the spinach and gently stir through. Spoon the gnocchi and sauce into 6 x 250ml (1 cup) ovenproof dishes or ramekins, dividing evenly. Top with the bocconcini.
- Bake in preheated oven for 15 minutes or until bocconcini has melted and the sauce is bubbling. Remove from the oven and stand for 5 minutes before serving.
Baker's Tips
- You can also make this baked gnocchi by using 750g bought fresh gnocchi instead of making the pumpkin gnocchi.
- You can also bake this recipe in a 1.5 litre (6 cup) ovenproof dish. The baking time and temperature will be the same.
This recipe is from Anneka's SBS Food online column, Bakeproof: Kids in the Kitchen. CLICK HERE for more Bakeproof recipes.
Photography by Alan Benson.

Prep 20minBake 17-20minMakes about 24
Ingredients
1 quantity Shortcrust Pastry, divided into 2 portions before wrapping and chilling
Filling
1½ rashers bacon, trimmed and finely choppedMethod
- With a lightly floured rolling pin, roll out one portion of pastry on a lightly floured surface until about 2mm thick. Use a 7cm round cutter to out 12 circles and then carefully ease them into an ungreased 12-hole mini (1½ tablespoon capacity) muffin tray, pleating the pastry 4-5 times to help shape it. Repeat with the remaining pastry and another 12-hole mini muffin tray to make 24 tartlet cases in total. Use a fork to prick the base of each tartlet case twice. Place the muffin trays in the freezer for at least 30 minutes or until ready to bake.
- Preheat oven to 200°C (180°C fan-forced).
- Meanwhile, to make the filling, cook the bacon in a non-stick frying pan over medium heat for 5 minutes, stirring occasionally, or until starting to crispen. Transfer the bacon to a medium bowl and add the cheese and parsley. Whisk together the egg and cream, add to the bacon mixture and stir with a fork to combine. Season with pepper.
- Bake the unfilled frozen tartlet cases straight from the freezer in preheated oven for 12 minutes or until golden.
- Use a teaspoon to fill each pre-baked tartlet case with a small amount of the the filling, making sure you get a good amount of the bacon, cheese and egg mixture in each. Return to the oven and bake for 5-8 minutes or until the filling is just set.
- Serve warm or at room temperature garnished with a tomato slice, if desired.
Baker's Tips
- You can make these tartlets up to 2 days ahead of serving. Cool and then store in an airtight container in the fridge. Place the tartlets back in the tins before reheating in an oven preheated to 160°C (140°C fan-forced) for 10 minutes or until heated through.

Prep 30min (+20min resting time)Bake 16-18minMakes about 8
Just like the ones you buy, these thin, crisp wafers are the perfect addition to any cheese board. Serve them alongside a soft washed-rind cheese, soft feta, nutty cheddar or any number of dips, such as beetroot or baba ghanoush.
Ingredients
- 225g (1½ cups) plain bread or pizza flour
- 1 teaspoon sea salt, crushed plus extra to sprinkle
- 125ml (½ cup) water
- 60ml (¼ cup) olive oil, plus extra to roll
- 2 teaspoons sesame seeds, to sprinkle
Method
- Preheat oven to 180°C (160°C fan forced). Line 2 large oven trays with non-stick baking paper.
- Combine the flour and salt in a large mixing bowl and make a well in the centre. Combine the water and olive oil, add to the flour mixture and use a wooden spoon and then your hands to mix to a soft dough.
- Turn the dough onto a lightly floured surface and knead for 1 minute or until smooth, elastic and bounces back when you press your finger into it. Wrap the dough in plastic wrap and set aside for 20 minutes to rest.
- Divide the dough into 8 portions and roll each in a little extra olive oil to coat lightly. Use your hands to flatten a portion into a rough rectangle and then use a rolling pin to roll out thinly and evenly into a large rectangle about 2mm thick (see Baker’s tip). Place on the lined trays. Repeat with three of the remaining dough portions. Brush the wafers with a little extra olive oil and sprinkle with extra salt and sesame seeds.
- Bake the four wafers in preheated oven for 16-18 minutes, swapping the trays around halfway through baking, or until golden and crisp. Cool on the trays. Repeat with the remaining four dough portions to make eight large wafers in total. Break into smaller pieces to serve.
Baker's Tips
- The more evenly you can roll the dough, the more evenly it will bake.
- These wafers will keep in an airtight container or jar at room temperature for up to 1 week
This recipe is from Anneka's SBS Food online column, Bakeproof: Savoury Crackers.
CLICK HERE for more Bakeproof recipes.
Photography by Benito Martin.
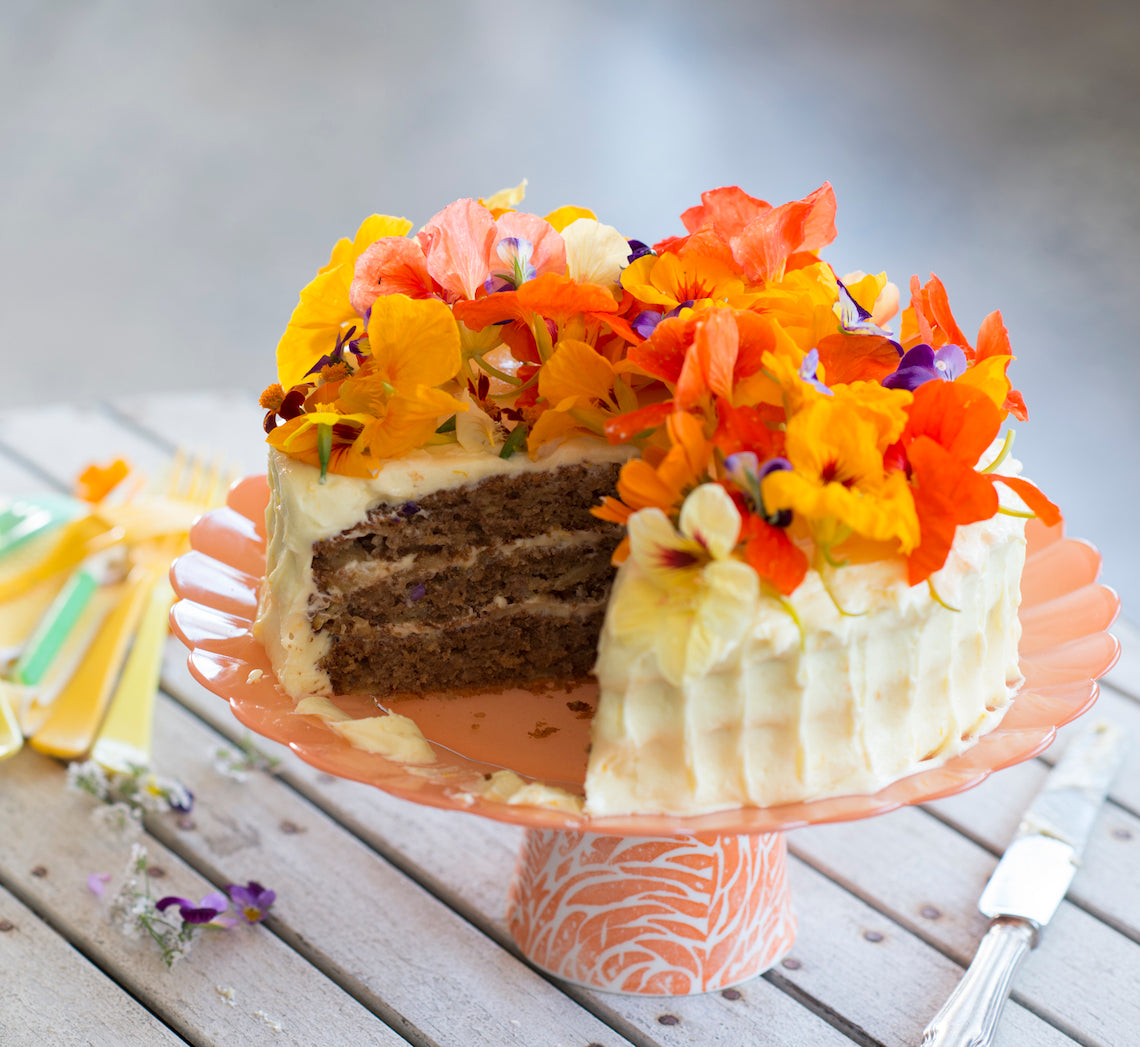
Prep 30minBake 30-35minMakes 12-15 serves
Originating (and excessively popular) in America, Hummingbird cake is a tropical mix of banana and pineapple, and when layered with an orange cream cheese frosting makes a great celebration cake. Sweet and indulgent, a small slice is all that is needed to satisfy.
Ingredients
150g (1 cup) plain flour
75g (½ cup) self-raising flour
½ teaspoon bicarbonate of soda
2 teaspoons ground cinnamon
220g (1 cup, firmly packed) brown sugar
45g (½ cup) desiccated coconut
2 very ripe large bananas (about 250g each)
440g crushed pineapple in natural juice, drained and juice reserved
2 eggs, lightly whisked
185ml (¾ cup) sunflower oil, plus extra to grease
Orange cream cheese frosting
100g unsalted butter, at room temperature
250g cream cheese, at room temperature
1 orange, zest finely grated
375g (3 cups) icing sugar mixture, sifted
Method
- Preheat oven to 180°C (160°C fan-forced). Brush three 20cm round cake tins with extra sunflower oil to lightly grease and line the bases with non-stick baking paper.
- Sift together the plain and self-raising flours, bicarbonate of soda and cinnamon. Add the brown sugar and coconut and stir to combine, breaking up any lumps.
- Mash the banana and combine with the drained pineapple, 80 ml (⅓ cup) of the reserved pineapple syrup, eggs and oil. Add to the flour mixture and use a wooden spoon or spatula to mix until just combined.
- Divide the mixture evenly among the prepared tins and spread with the back of a metal spoon to smooth the surface. Bake in preheated oven for 30-35 minutes or until cooked when tested with a skewer.
- Stand the cakes in the tins for 5 minutes before turning onto wire racks to cool (this will take about 1 hour).
- Meanwhile, to make the Orange cream cheese frosting, use an electric mixer to beat the cream cheese, butter and orange zest until very smooth. Gradually add the icing sugar, beating well after each addition and beat until well combined and really creamy. Divide the Orange cream cheese frosting evenly among 3 bowls.
- Take one portion of the Orange cream cheese frosting and use a palette knife to spread half over one cake layer. Top with a second cake layer and spread with the remaining frosting of the first portion. Top with the remaining cake layer. Spread another portion of frosting over the sides and the remaining portion over the top of the cake. Sprinkle with the pecans to decorate
Baker's Tips
- This cake will keep in an airtight container in the fridge for up to 4 days. Stand at room temperature for about 30 minutes before serving.
This recipe is from Anneka's SBS Food online column, Bakeproof: Cakes for Crowds. CLICK HERE for more Bakeproof recipes.
Photography by Alan Benson.
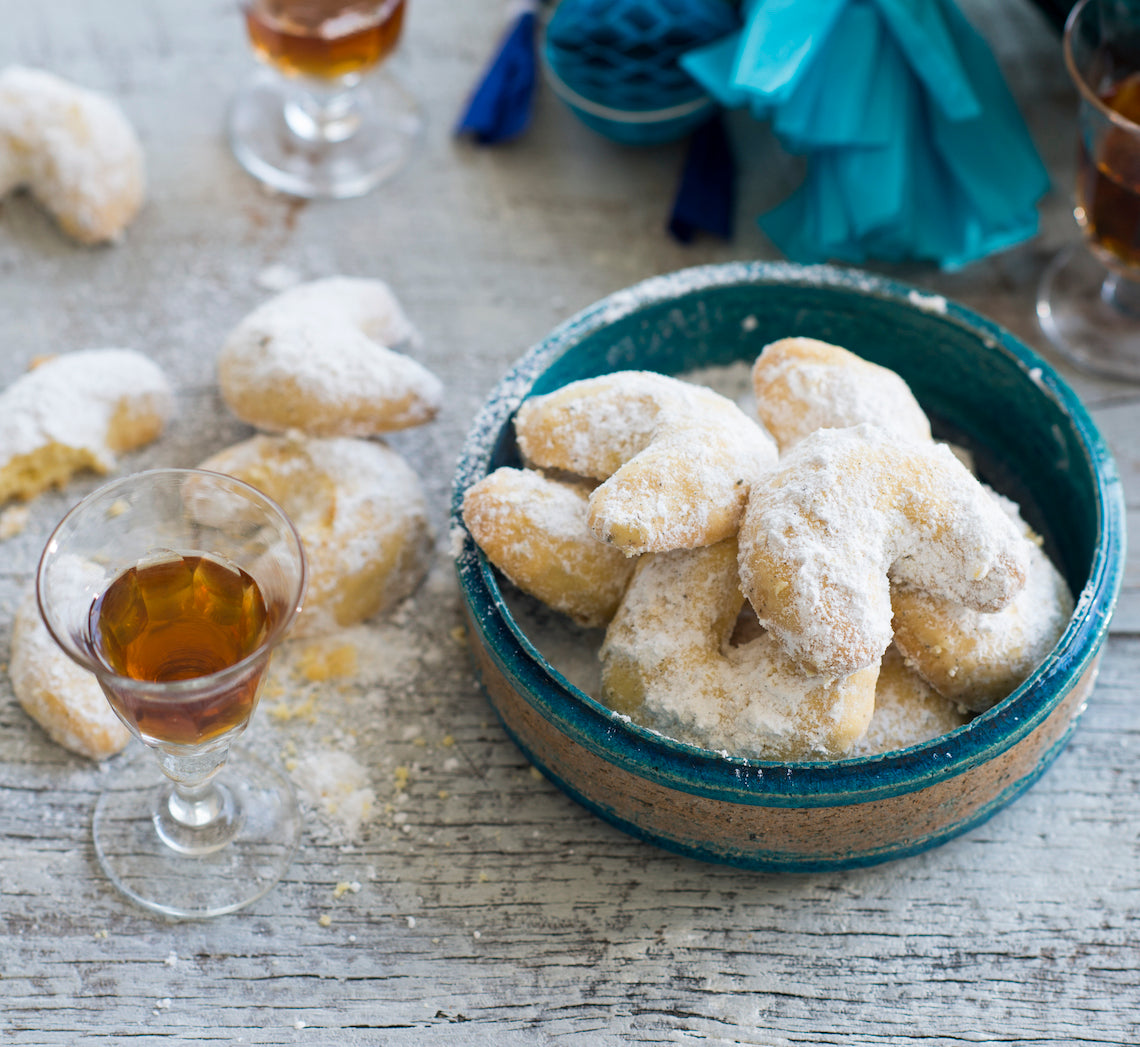
Prep 40min (+ 30min cooling time)Bake 25-30minMakes about 24
Originating in Vienna in Austria these vanilla sugar-coated biscuits are always made in a ‘kipfler’ or horse-shoe shape. Traditionally made at Christmas, they’re also popular in many other eastern European countries, including Germany, Hungary, Slovakia, Romania and the Czech Republic. These buttery almond biscuits make a wonderful gift.
Ingredients
185g unsalted butter
60g (½ cup) icing sugar mixture, plus 60g (½ cup) extra to coat
1 teaspoon natural vanilla essence or extract
2 egg yolks
225g (1½ cups) plain flour
50g (½ cup) almond meal
1 vanilla bean
Method
- Preheat oven to 160°C. Line two large oven trays with non-stick baking paper.
- Use an electric mixer to beat the butter, icing sugar mixture and vanilla essence or extract until pale and creamy. Add the egg yolks and beat until well combined.
- Combine the flour and almond meal, add to the butter mixture and beat on lowest possible speed until just combined.
- Shape level tablespoonfuls of the mixture into small logs about 6cm long and then taper the ends and shape into a crescent shape. Place on the lined trays about 2cm apart. Bake in preheated oven for 25-30 minutes or until pale golden and cooked through.
- Meanwhile, halve the vanilla bean lengthways, use a small sharp knife to scrape the seeds out and add to the extra icing sugar mixture in a medium bowl. Use your fingertips to rub the vanilla seeds through the icing sugar evenly.
- When the biscuits are cooked, remove from the oven and then toss while still warm, one at a time, through the vanilla icing sugar to coat (see Baker’s tips). Cool completely on a wire rack.
Baker's Tips
- These biscuits will keep in an airtight container at room temperature for up to 1 week.
- Reserve any remaining vanilla sugar and use to sprinkle over the biscuits before serving if you wish.
This recipe is from Anneka's SBS Food online column, Bakeproof: Traditional Christmas Baking.
CLICK HERE for more Bakeproof recipes.
Photography by Alan Benson.
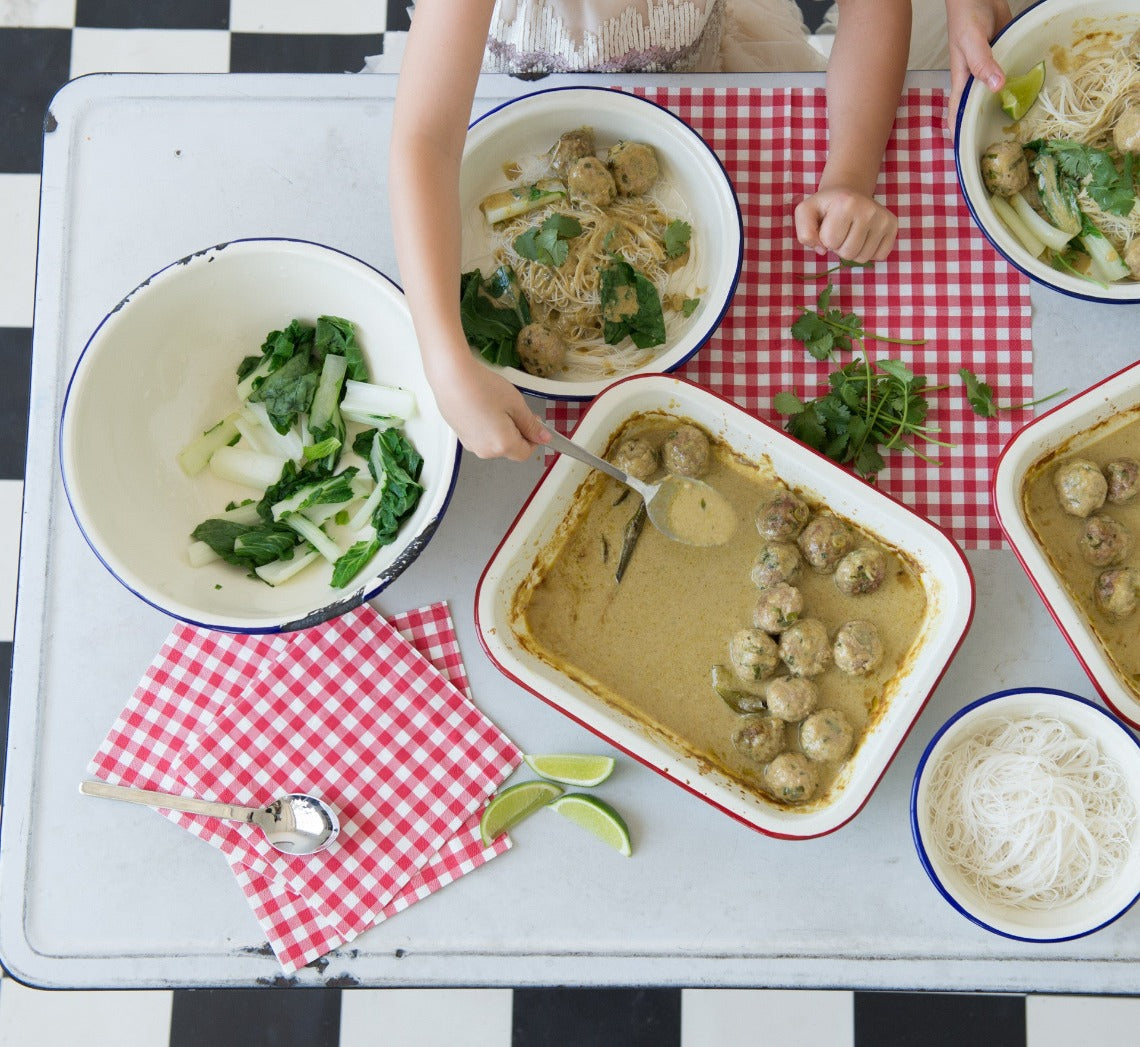
Prep 30minBake 30minMakes 4-6 serves
Any recipe that gets kids rolling balls of mixture will help develop their fine motor skills no matter what their age. Fun to make, these meatballs also encourage independence — put all the components in the middle of the table for everyone to help themselves.
Ingredients
200g dried rice vermicelli, cooked according to packet directions
fresh coriander leaves, lime wedges and steamed asian greens, to serve
Meatballs
500g pork and veal mince (see Baker's Tips)
18g (⅓ cup) panko rice crumbs
2 tablespoons milk
3 teaspoons finely grated fresh ginger
1½ tablespoons finely chopped drained canned water chestnuts
5 green shallots, thinly sliced
⅓ cup finely chopped coriander
Sauce
2 teaspoon peanut oil
3 tablespoons good-quality green curry paste, or to taste (see Baker's Tips)
125ml (½ cup) good-quality chicken stock
500ml (1 cup) water
440ml can coconut milk
4 kaffir lime leaves
2 teaspoons fish sauce, or to taste
1 tablespoon lime juice, or to taste
2 teaspoon grated palm or brown sugar, or to taste
Method
- Preheat oven to 180°C (160°C fan-forced).
- Combine the mince, crumbs, milk, ginger, water chestnuts, green shallots and coriander in a large bowl and mix well with your hands until thoroughly combined. Use damp hands to roll 2 teaspoonfuls of the mixture into balls and place in one layer in a shallow 20cm x 30cm/2.5 litre (10 cup) capacity ovenproof dish. Cover and place in the fridge while making the sauce.
- To make the sauce, combine the peanut oil and curry paste in a medium saucepan and cook over medium-high heat for 2-3 minutes, stirring occasionally, or until aromatic. Add the stock, coconut milk, kaffir lime leaves, fish sauce, lime juice and sugar and bring just to a simmer over medium heat.
- Pour the sauce over the meatballs. Bake in the preheated oven for 30 minutes or until the meatballs are just cooked through. Taste the sauce and adjust seasoning with extra fish sauce, lime just and sugar if desired.
- Divide the noodles among four bowls and spoon over the meatballs and some of the sauce. Top with coriander leaves and serve with lime wedges and steamed Asian greens.
Baker's Tips
- You can also use just pork mince for this recipe.
- You may find you need to use a little less or add a little more green curry paste depending on the brand you use as they can vary greatly in flavour and heat intensity. Keep also in mind your childrens' flavour preferences as you don’t want to make it too hot for their sensitive tastebuds.
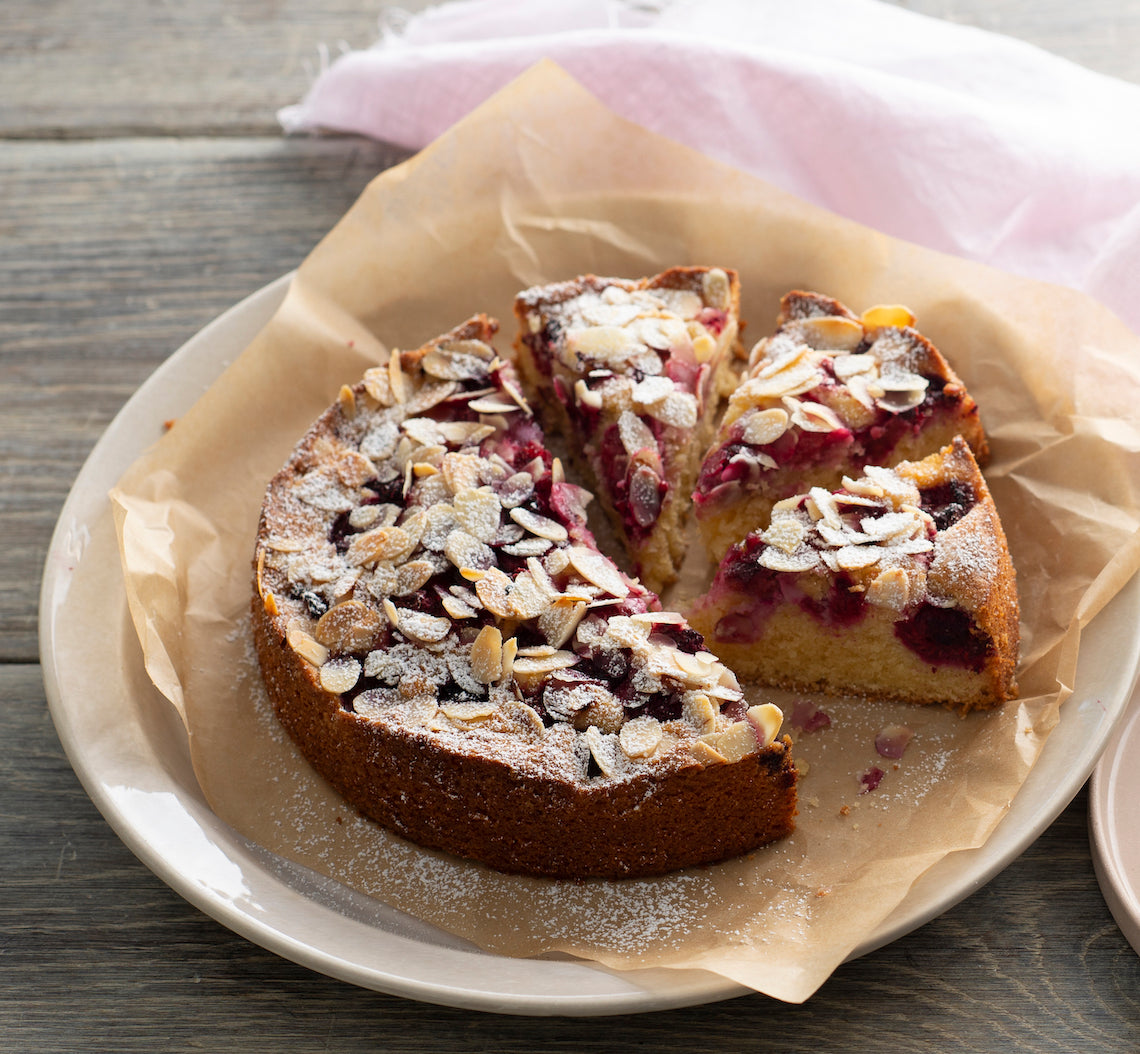
Prep 10minBake 35-40 minMakes 8-10 serves
If you are looking for a quick, easy, impressive, and not to mention delicious, cake, this is the one. Lots of clever shortcuts (like using your food processor to make it) means that this cake will be in the oven in less than 10 minutes!
Ingredients
- Melted butter, to grease
- 100g (3½oz) chilled unsalted butter, cubed
- 110g (½ cup/4oz) caster sugar
- 75g (¾ cup/2¾oz) almond meal
- 75g (½ cup/2¾oz) plain flour
- 1 teaspoon baking powder
- 2 eggs, at room temperature
- 1 teaspoon natural vanilla essence or extract
- 150g (5¼oz) fresh or frozen raspberries
- 25g (¼ cup/¾oz) flaked almonds
- Icing sugar, to dust
Method
- Preheat oven to 180°C/350°F (160°C/315°F fan-forced). Grease a 20cm/8in springform (base measurement) with the melted butter and then line the base with a piece of baking paper.
- Put the butter, sugar, almond meal, flour and baking powder in the bowl of a food processor. Process until well evenly combined and the mixture resembles fine breadcrumbs. Add the eggs and vanilla use the pulse button to process until smooth and just combined.
- Spoon the mixture into the prepared pan and smooth the surface with the back of a spoon. Sprinkle evenly with the raspberries and then use the back of a clean spoon to press the raspberries into the cake mixture. Sprinkle with the almonds.
- Bake in preheated oven for 35-40 minutes or until golden and cooked in the centre when tested with a skewer.
- Stand the cake in the pan for 5 minutes before removing the side of the pan and placing the cake (still on the base) on a wire rack. Serve warm or at room temperature dusted with icing sugar.
Baker's Tips
- The raspberries can be replaced with 150g (5¼oz) blueberries or quartered strawberries.
- For a nut-free version, the almond meal can be replaced with 75g (2¾oz) desiccated coconut and sprinkle with 25g (¼ cup/¾oz) flaked coconut.
- This cake will keep in an airtight container in a cool spot (but not in the fridge) for up to 3 days.
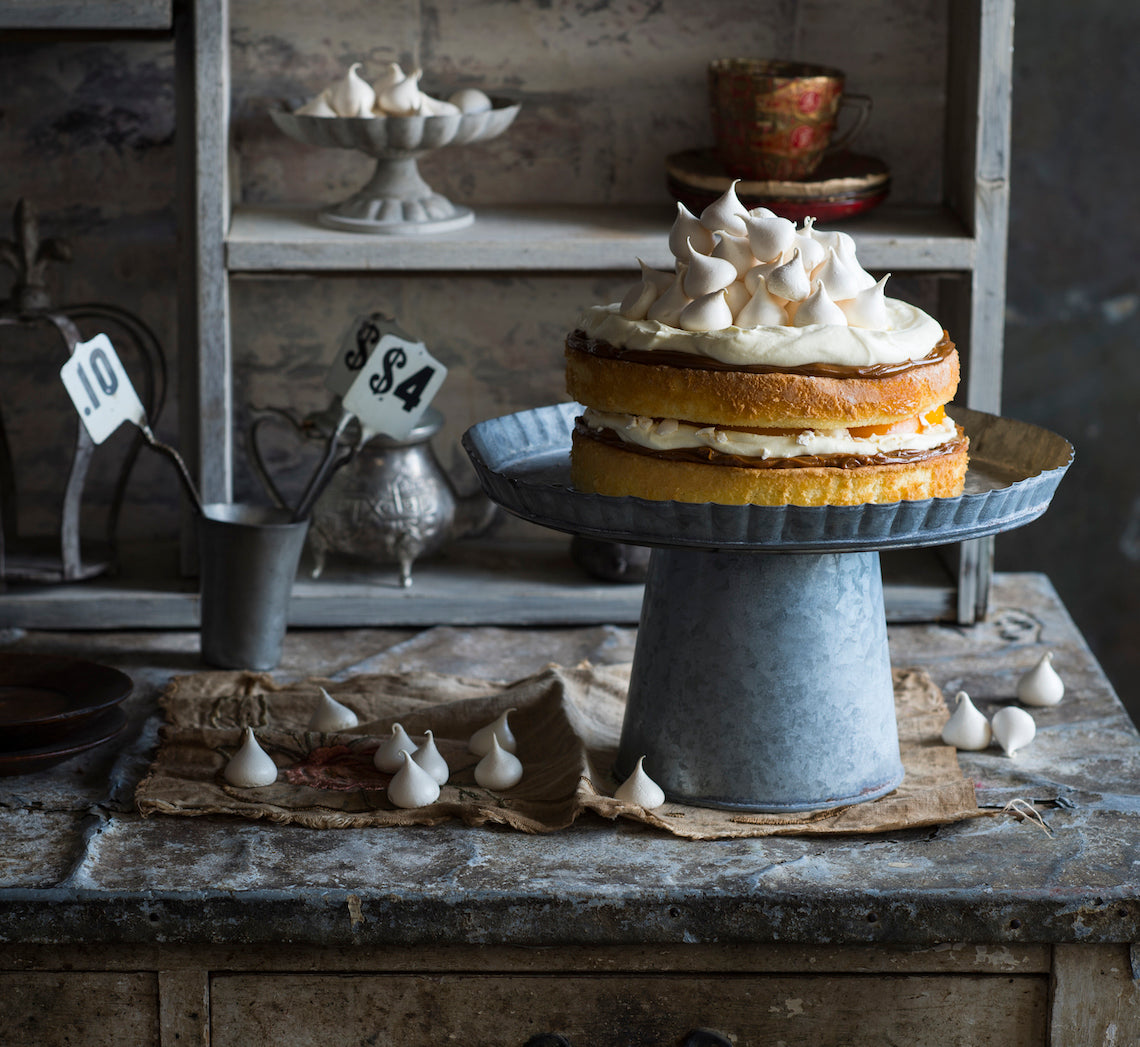
Prep 1hr15min (+2hr chilling and 1hr cooling time)Bake 1hr20minMakes 10 serves
This blissful combination of sponge cake, cream, meringue, dulce de leche and peaches takes its name from a native Uruguayan bird – apparently the meringues resemble the features of a chaja bird. I must admit I find it hard to see the resemblance and feel this wonderful cake has been dealt a slight disservice in its naming!
Ingredients
400g (14oz) tin sliced peaches in juice
55g (¼ cup/2oz) caster sugar
2 tablespoons peach-flavoured liqueur or schnapps
300ml (10¼fl oz) thickened cream
1 teaspoon natural vanilla essence or extract
2 x 20cm/8in sponge cakes
225g (¾ cup/8oz) dulce de leche, warmed gently to a spreadable consistency
Meringues
2 egg whites (from 60g/2oz eggs)
110g (½ cup/4oz) caster sugar
1 teaspoon vanilla essence
Method
- To make the Meringues, combine the egg whites and sugar in a medium heatproof bowl (preferably metal) and place over a saucepan of simmering water, ensuring the bowl doesn’t touch the water. Stir with a spatula or small whisk until the sugar dissolves and the mixture is hot to touch (about 55-60°C on a sugar thermometer). Be careful not to allow the egg whites to cook.
- Transfer the egg white mixture to the bowl of an electric mixer (see Baker’s Tips). Whisk the egg white mixture with a whisk attachment on medium-high speed until very thick and glossy and the mixture has cooled to room temperature. Whisk in the vanilla and cornflour.
- Fill a large piping bag fitted with a 4B star (or #11/11mm/½in round) piping nozzle with the meringue mixture. Holding the piping nozzle about 1cm/½in above the tray, pipe small rosettes (or 'kisses') about 2.5cm/1in in diameter and 2cm apart on the lined tray.
- Bake in a preheated oven for 60-70 minutes or until the meringues are crisp, hard to touch and peel away from the tray easily, but are not coloured. Remove the meringues from the oven and place immediately in an airtight container lined with absorbent paper.
- Drain the peach slices, reserving 100ml (3½fl oz) of the juice. Set the peach slices aside. Combine the reserved juice in a small saucepan with the sugar and stir over low heat until the sugar dissolves. Bring to a simmer and simmer gently for 2 minutes to reduce slightly. Remove from the heat and stir in the peach-flavoured liqueur or schnapps.
- Use an electric mixer with a whisk attachment on medium-low speed or a balloon whisk to whisk the cream and vanilla until soft peaks form.
- To assemble the cake, turn the sponge layers upside down and brush with half the peach syrup. Turn the sponges right side up and brush with the remaining syrup. Place one layer on a serving plate and spread with half the dulce de leche. Spread with half of the whipped cream. Crumble over about 12 of the meringues and then top with the reserved peach slices. Cover with the remaining sponge layer. Spread the top with the remaining dulce de leche and then the remaining cream. Decorate the top with the remaining meringues. Serve immediately.
Baker's Tips
- The assembled cake, without the meringues on top, will keep in the fridge for up to 3 hours before serving. Stand at room temperature for 30 minutes before serving.
- The fan-forced setting is often too intense for baking meringues and will cause them to crack. If this is the case with your oven, opt for the conventional setting. However, if the meringues do crack when using the convention setting, your oven may be running a little hot and next time reduce the temperature by 5-10°C (41-50°F) as this will often help prevent them from cracking.
- If you don't have a small bowl for your mixer, first whisk the egg white mixture with a balloon whisk until it is foamy and doubled in volume before whisking with the stand mixer. This will make the whisking of the egg white mixture more efficient in a standard size bowl.
- Allowing the egg white mixture to come to room temperature before whisking will reduce the time it will take to whisk it to a meringue.
- The meringues will keep in an airtight container at room temperature for up to 1 week.
This recipe is from Anneka's SBS Food online column, Bakeproof: Latin American Cakes.
CLICK HERE for more Bakeproof recipes.
Photography by Alan Benson.


